Sealed 6-Mil Poly Vapour Barrier Installation in Airdrie
Continuous 6-mil polyethylene on the warm side of insulated walls and ceilings, with laps landed on framing and sealed with acoustical sealant, plates sealed top and bottom, and every electrical box and penetration closed. Built to be inspected, not just stapled up.
The Problem It Solves
The vapour barrier is the part of an insulated wall that nobody looks at once drywall is up, and it is often the part done in the biggest hurry. Poly gets stapled to the studs with loose laps between studs, cut out wholesale around electrical boxes, torn around pipes and left open at the top and bottom plates. From inside the wall, it is a sheet with dozens of holes.
Those holes matter because of how moisture moves in winter. Indoor air carries moisture from showers, cooking, laundry and the people living in the house. Far more of that moisture travels into walls on leaking air than diffuses through intact materials. When warm air leaks through an unsealed box or an open lap and reaches cold sheathing or a rim joist in a cold snap, it condenses or turns to frost. When the weather warms, that frost melts into the wall.
The results are slow and hidden: stained sheathing, mould on the back of drywall, rusted nail heads, damp insulation that no longer insulates, and musty basement corners. In basements, the rim joist and header area behind poly-over-batts is the classic trouble spot. The same gaps let cold outdoor air in, so the room feels drafty at outlets and baseboards while moisture quietly builds up at the cold edge of the wall, where nobody will see it for years.
How It Works
A properly installed polyethylene vapour barrier does two jobs. As a material, 6-mil poly has very low vapour permeance, well within the code limit for a vapour barrier. As a system, when it is continuous and sealed, it also becomes a large part of the house’s air barrier. The second job is where most of the benefit comes from, and it depends entirely on details: every lap landed over solid framing and sealed, every plate sealed, every box and pipe closed off.
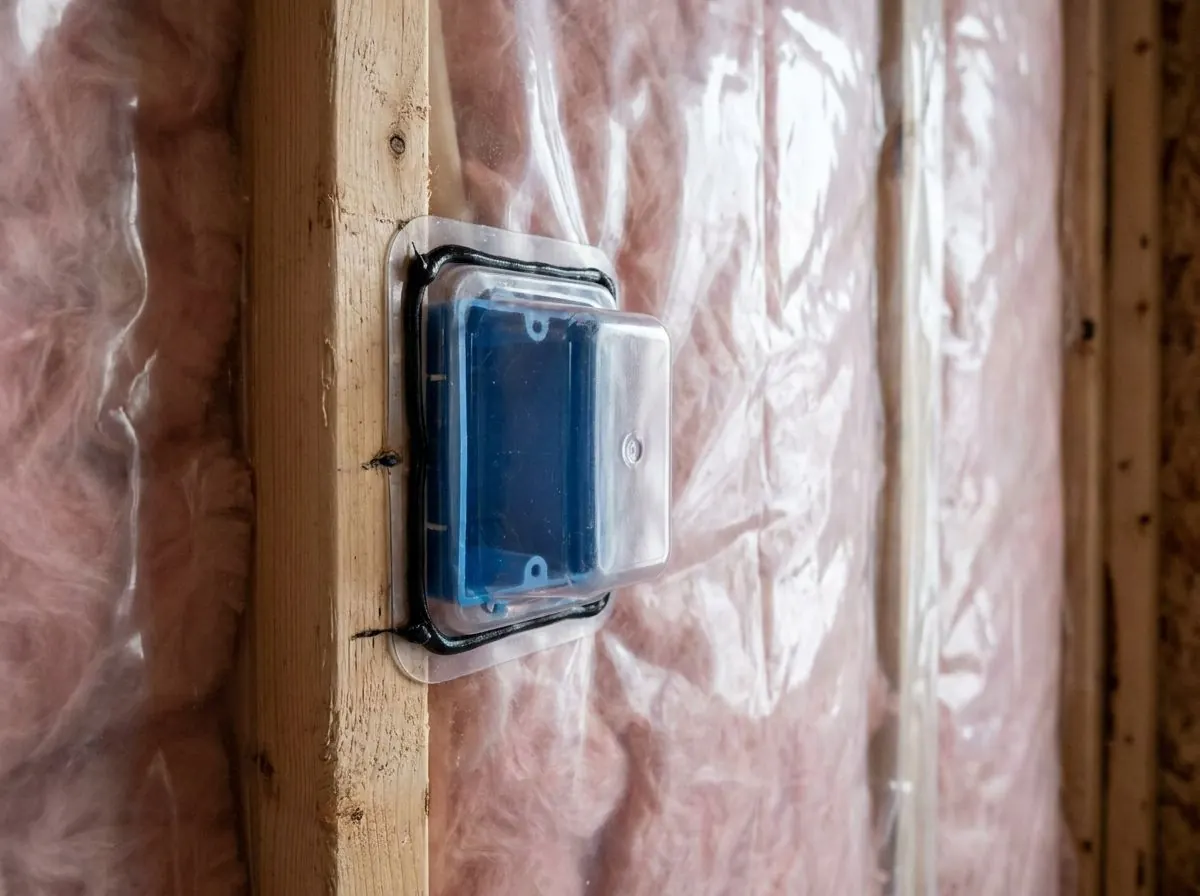
The sealant used is acoustical sealant, often called black butter. It is a non-hardening, non-skinning sealant, so it stays sticky and flexible as framing dries and the house moves, keeping the poly bonded to the wood. Poly vapour hats sealed around electrical boxes, or purpose-made airtight boxes, stop the outlet from becoming a leak. Sealed properly at every one of those points, the wall keeps warm, moist air in the room and out of the cold parts of the assembly.
How the Job Runs, Step by Step
Confirm the insulation behind it
We look at what the poly will cover. Batts should fill every bay. Rim joists and headers should be sealed and insulated, ideally with closed-cell foam. If closed-cell foam at about two inches or more already acts as a vapour barrier, or a builder blanket already has a poly face, we do not add a second vapour barrier without the designer’s sign-off, because two barriers can trap moisture between them.
Run sealant at the plates and lap lines
Before the poly goes up, a continuous bead of acoustical sealant is run along the bottom plate, the top plate and any framing member where two sheets of poly will overlap. The sealant goes onto clean, dry wood. At the top of basement walls, the bead ties the wall poly into the rim joist or header detail so the vapour barrier is continuous around the corner.
Hang the poly in large sheets
We use the largest practical sheets to keep laps few. Poly is pressed into the sealant bead and stapled through it so the staple holes are sealed. The poly is kept reasonably taut without stretching, so it does not tear when drywall is screwed on.
Seal boxes and penetrations
Every electrical box on an insulated wall or ceiling gets a poly hat sealed to the main sheet, or an airtight box sealed to it. Pipes, ducts and wires passing through are sealed with sealant and patches. Around windows and doors, the poly is sealed to the frame’s air seal so the opening is not a gap in the system.
Inspect and patch before drywall
We walk every wall and ceiling looking for tears, open laps, missed staples outside a sealant bead and unsealed boxes, and patch each with poly and sealant. Where the work is part of a permitted basement development or renovation, the vapour barrier is left ready to be seen before drywall covers it.
What Decides the Specification
For most walls and ceilings in Airdrie houses, the material itself is not in question: 6-mil poly to the CGSB standard, acoustical sealant and poly hats or airtight boxes. What changes from job to job is the assembly behind it. A framed basement wall in front of a builder blanket, a wall with closed-cell foam at the rim, a cathedral ceiling or a wall with exterior continuous insulation each change where the vapour control layer belongs and whether poly is needed at all.
Details at the edges decide most of the specification. Basement walls need a plan for how the wall poly joins the rim joist foam or header. Ceilings under an attic need the poly carried past the top plate and sealed so the attic does not get warm moist air through the wall-to-ceiling joint. Stairwells, bulkheads and pot lights are planned before the first sheet goes up, because retrofitting continuity there is hard.
Alberta Code Notes
Section 9.25 of the National Building Code – 2020 Alberta Edition covers heat transfer, air leakage and condensation control. For Part 9 houses, a vapour barrier must have a permeance of not more than 60 ng/(Pa·s·m²), and polyethylene used for the purpose is commonly 0.15 mm (6-mil) material to CAN/CGSB-51.34. The vapour barrier goes on the warm side of the insulation, and the air barrier system has to be continuous: sealed at laps over framing, at plates, at penetrations and at electrical boxes.
A basement development in Airdrie normally needs a building permit from the City of Airdrie, or from Rocky View County for properties outside city limits, and the insulation and vapour barrier are part of that inspected work. The authority having jurisdiction decides what a particular project needs, so we build the vapour barrier to be seen and leave it ready for inspection before it is covered, with nothing hidden behind it.
General guidance only. The authority having jurisdiction and the product’s own evaluation report decide what applies to your job.
Around Airdrie
Kings Heights, built mostly from the late 2000s through the 2010s, has many walkout and basement developments. Walkout walls are part foundation and part wood-frame, which puts a lot of vapour barrier continuity work at the transition between concrete and framing, at the rim joist, and around the larger windows and patio doors that walkouts usually have. Those junctions are where an unsealed detail is most likely to show up later as frost at the rim or a damp corner behind the finished wall.
Airdrie’s climate is dry for most of the year, which leads some people to think vapour control is less important here. The opposite is true in winter. Indoor air in a lived-in house carries plenty of moisture, the outdoor air is very cold for long periods, and chinooks can melt frost that has built up inside a wall or attic within hours. A sealed vapour barrier is what keeps that cycle from happening inside the assembly in the first place.
Often Done Alongside
Fibreglass Thermal Batts
R-14 to R-28 friction-fit batts, cut tight for exterior stud walls.
Cold Basement Walls & Rim Joists
Closed-cell foam on rim joists and foundation walls for warm, dry basements.
Attic Air Sealing & Penetration Proofing
Hand-sealing stacks, wiring holes, top plates, fixtures and flue chases.
Where We Do This Work
Vapour Barrier: Questions We Get
Why use acoustical sealant instead of just stapling the poly?
Do interior wall outlets need poly vapour hats?
Should poly go directly against the basement concrete?
What happens if the poly gets torn before the drywall goes on?
How do you work out what my home actually needs?
Considering Vapour Barrier?
Call Airdrie Insulation or send the details. We will look at the job, tell you whether vapour barrier is the right fix, and price it in writing.